It happened during a 400 IM set last Tuesday – right in the middle of the breaststroke leg, water started seeping into my left goggle.
Not a flood. Just that slow, maddening trickle that fills the cup while you’re trying to count strokes.
My first instinct, every single time? Yank the strap tighter at the wall.
It didn’t help. It never does.
If you’re asking why are my swim goggles leaking, the real answer almost always comes down to the goggle seal – not the strap. The strap is just a retaining clip. It holds the seal in place. It cannot create one.
This guide walks you through five diagnostic steps that fix the actual problem, starting with a test most swimmers have never tried.
🏊 Quick Summary – Key Takeaways
- What you’ll learn: How to diagnose where the leak is coming from and fix the seal.
- Time to see results: 5 minutes before your next swim.
- Difficulty level: Beginner to Intermediate.
- Key equipment needed: Your current goggles and any spare nose bridges they came with.
⚠️ Safety Disclaimer & Target Audience
Best for: Beginner to Intermediate swimmers fighting mid-lap water intake.
Skip if: You are actively shopping for a new pair – check our buying guide instead.
Coach’s reminder: According to a study published in the British Journal of Ophthalmology, wearing swimming goggles can cause an acute, temporary elevation in intraocular pressure. Stop immediately if you feel eye pain or get severe headaches, especially if you have glaucoma or a history of eye surgery.
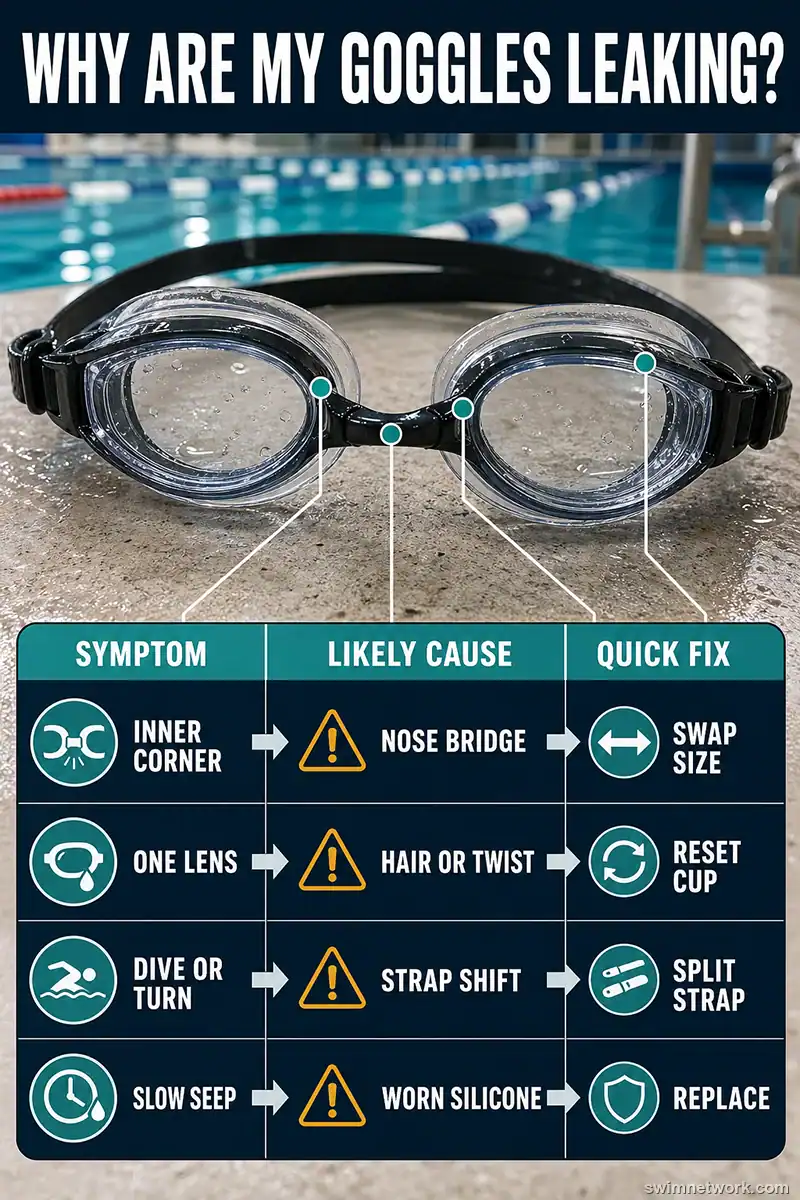
Table of Contents
- Before You Test Anything, Grab These
- Why Your Strap Doesn’t Actually Keep the Water Out
- Step 1: Prove the Seal Works Without the Strap
- Step 2: Fix Leaks Near the Inner Corners
- Step 3: Stop the Leaks During Dives and Turns
- Step 4: Clear the Hidden Blockers
- Step 5: Recognize Dead Silicone
- These “Fixes” Actually Destroy Your Seal Faster
- Your Poolside Troubleshooting Checklist
- Keep Your Clear Vision Going
- The Goggle Questions I Get Every Season
- When to Switch Goggles Instead of Fighting the Same Pair
Before You Test Anything, Grab These
You don’t need anything exotic for these tests.
Pull out your goggles, look inside the box for any spare nose bridges (most goggle brands include two or three sizes), and find a mirror if you have one nearby.
That’s it. Dry face, your current goggles, spare nose pieces if they exist.
Every fix below works with what you already own.
Why Your Strap Doesn’t Actually Keep the Water Out
Here’s the part most swimmers get backwards.
The silicone gasket – that soft ring around the lens – is the actual seal. It works by creating a slight suction against the skin around your eye socket, forming a watertight barrier.
The strap’s job is to hold that gasket in contact with your face. Nothing more.
As Oakham Swim School explains in their goggle fitting guide, a properly fitted goggle should hold a brief suction against the face even without the strap attached. If it doesn’t… that’s your diagnosis right there.
When you crank the strap tighter to stop a leak, you’re not improving the seal. You’re compressing it. Sometimes that works by accident – mostly it distorts the gasket shape and makes the problem worse.
📹 Video Quick Recap:
- Press the goggle lens against your eye socket without attaching the strap at all.
- A goggle that fits your face shape will hold a brief seal on its own due to suction.
- If the goggle falls away immediately, the lens shape does not match your eye socket geometry – no amount of strap tension will fix that mismatch.
- The strap is a retaining device, not the primary sealing mechanism.
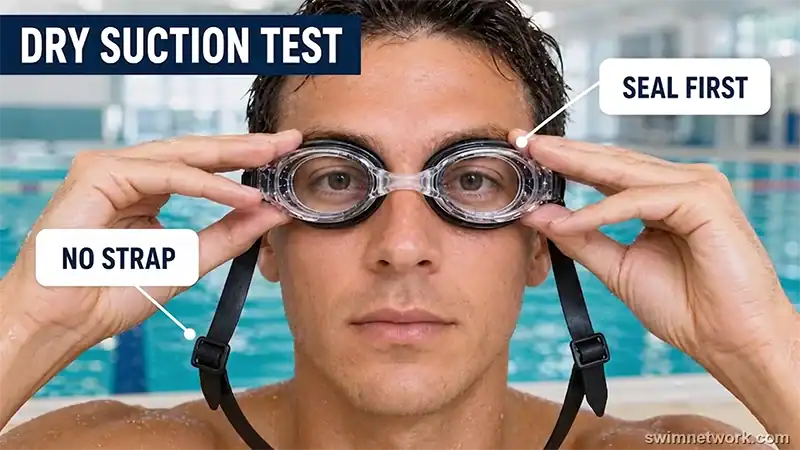
Step 1: Prove the Seal Works Without the Strap
Before you adjust anything else, run this test. It takes ten seconds and tells you everything.
If you keep leaking consistently and suspect the goggle shape itself is the issue, a wider profile might be the answer – our guide on swim goggles vs. swim masks explains when a mask-style seal is the better fit for certain face shapes.
💡 Coach’s Tip
I tell every swimmer I coach the same thing on day one: learn the dry suction test, and learn it on dry land before you ever get in the pool. Two minutes on the pool deck saves you 40 minutes of mid-set frustration. If the cups don’t hold for at least a second without the strap – that shape doesn’t fit your face. Walk away from that pair.
Press It Without the Strap – If It Holds, Your Seal Is Fine
Remove the strap completely or hold it out of the way.
Press the goggle cups gently against your eye area – same way you would to put them on, but without engaging the strap.
Hold for three seconds, then let go slowly.
If the cups stay suctioned for even a moment, the goggle seal is geometrically compatible with your face. The leak is a setup problem, not a fit problem. Keep reading.
If the cups fall off immediately with no resistance at all, the lens profile doesn’t match your eye socket shape.
No adjustment to the strap will fix that. You need a different model.
The Temptation to Crank the Tension
I’ve watched swimmers at the wall between sets loop a finger under their strap and stretch it another inch tighter.
Sound familiar?
The logic feels right – if water is getting in, seal the gap with more pressure. But here’s what actually happens: over-tightening distorts the circular shape of the gasket.
Instead of lying flat against your skin, the silicone warps into an uneven oval. You’ve now created new gaps at the corners while pinching the center too hard.
Tight straps can also increase the pressure on the eye itself. If you finish a swim with visible goggle ring impressions that take more than a minute to fade, or if you feel any eye discomfort, the strap is too tight.
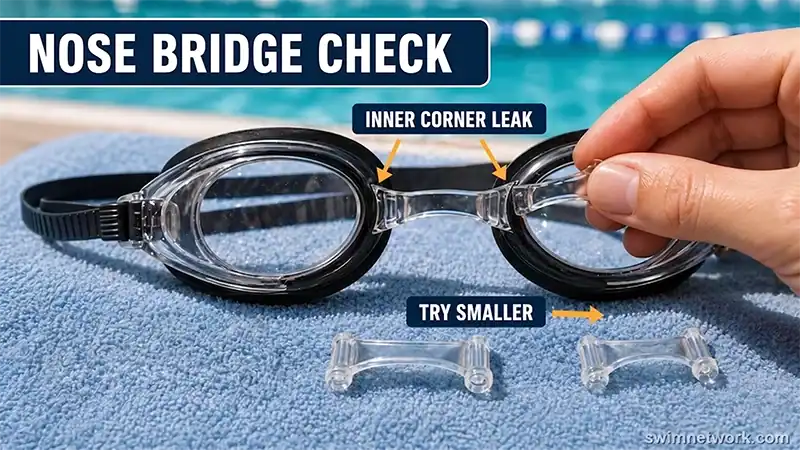
Step 2: Fix Leaks Near the Inner Corners
If the suction test passed but water consistently enters near your nose – specifically at the inner corners of the lenses – the nose bridge is almost certainly the culprit.
Why the Nose Piece Controls the Center
The nose bridge is the connector that sets the distance between the two eye cups.
If it’s too wide for your nose, the inner edge of each gasket lifts slightly off your skin, creating a gap right at the most leak-prone corner.
If it’s too narrow, it pulls the cups inward, lifting the outer edges instead.
Either way, the gasket can’t lie flat all the way around. And wherever it doesn’t lie flat, water finds a way in.
Try the Smaller Bridge First – Most Swimmers Never Do
Open the box your goggles came in. Most brands include two or three nose bridge sizes.
Pull out the current bridge and swap in the next size down. Put the goggles on normally, run the suction test again.
Most swimmers who have inner-corner leaks are running the default medium bridge when the small fits their nose much better.
I’ve had swimmers fix a six-month leaking problem with a twenty-second nose bridge swap. It’s almost embarrassing how simple it is – and how rarely anyone tries it.
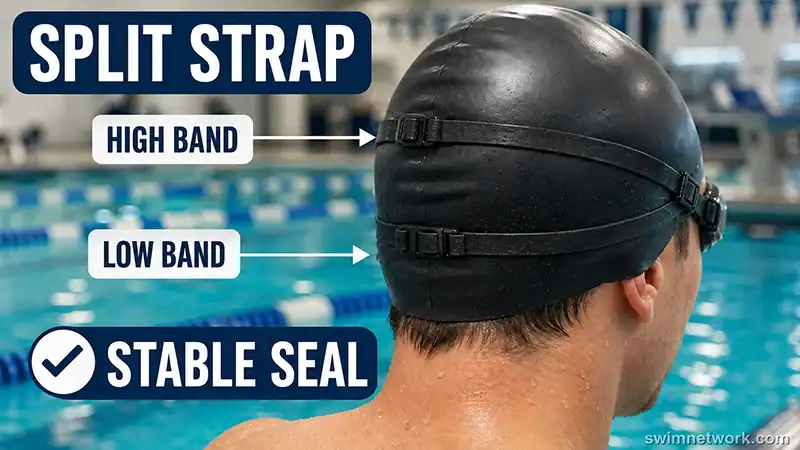
Step 3: Stop the Leaks During Dives and Turns
Your goggles seal fine on deck. They feel secure in the water. But the moment you push off the wall or hit a racing start, water floods in.
This is a strap stability problem, not a seal problem.
The impact of a dive or the water pressure during a fast flip turn creates a force that the standard strap can’t always absorb.
The cups rock forward or sideways for a fraction of a second – just long enough to break the seal.
Two Bands. Spread Them Apart. Most Swimmers Don’t.
If your goggles have a split strap (two bands instead of one at the back of the head), you have a significant advantage here.
Most swimmers route both bands to the same height – one sitting directly on top of the other. That’s not how they’re designed to work.
Spread them apart: one band should sit high on the crown of your head, and the other band lower, roughly at the widest point of the back of your skull.
This spreads the anchor points, distributing the pressure more evenly and making it much harder for the goggle to rock or shift during impact.
If your goggles only have a single strap, the fix is simpler: make sure it sits at the same height on both sides.
A strap that runs diagonally because one side is higher than the other will allow the cup on the lower side to shift during dives.
You’ve checked the seal, the nose bridge, and the strap. Still leaking?
Look at what’s between the gasket and your skin.
For sunscreen residue, grime buildup, and proper post-swim care, our goggle cleaning guide has a quick four-step routine that keeps the gasket in contact-ready condition.
A Single Hair Under the Gasket Will Flood Your Goggles
One strand of hair caught under the edge of the gasket is enough to create a water channel straight into the cup.
Check the perimeter of each lens before you put your goggles on. Pull any stray hair away from the seal area.
If you wear a swim cap, make sure the lower edge of the cap sits above the upper edge of the gasket – not overlapping it. The cap edge creates a ridge that can break the seal just as effectively as a hair.
Sunscreen is a different kind of problem. If you apply sunscreen to your face and then put goggles on, the silicone gasket is sitting on a thin oily film. That film prevents proper suction contact.
Rinse your face with water before putting on your goggles, or apply sunscreen to the goggle area after the goggles are already on.
Facial hair creates the same situation – a beard or heavy stubble breaks the gasket contact along the cheek line. There isn’t a great fix for this beyond trying a mask-style goggle with a wider silicone skirt that can bridge the gap.
Step 5: Recognize Dead Silicone
Everything above assumes the silicone gasket is still in working condition.
If your goggles are more than two or three seasons old and none of the fixes above help, the gasket itself may simply be done.
When you’re ready to replace them, our guide to the 22 best swimming goggles covers options across every face shape and swim style.
When to Give Up on the Gasket
Pick up your goggles and squeeze the eye cup gently.
Fresh silicone feels soft, pliable, and bounces back to its original shape immediately.
Old, degraded silicone feels stiff, sometimes slightly tacky, and may hold a compressed shape for a moment before recovering.
You might also see hairline cracks along the inner edge of the gasket, or small areas where the silicone has warped or pulled away from the lens frame.
None of these can be fixed with strap tension. A cracked gasket leaks. A warped gasket leaks. A stiff gasket that no longer conforms to your face shape… leaks.
If the nose bridge won’t stay clipped into its socket, or if the strap buckles are cracking, that’s also an end-of-life signal. No individual component lasts forever.
These “Fixes” Actually Destroy Your Seal Faster
While we’re here – a few pieces of advice you’ll find online that I’d strongly caution against.
Hot water reshaping: Some videos recommend submerging leaking goggles in hot water to “reshape” the silicone back to its original form. Don’t. Hot water breaks down the silicone and destroys the anti-fog coating on the lens interior. You’ll end up with a foggy, still-leaking pair.
Toothpaste: Occasionally suggested as an anti-fog or cleaning treatment. The abrasive particles in toothpaste scratch the lens surface and strip whatever anti-fog treatment remains. Avoid it entirely.
Anti-fog spray for leaks: Anti-fog spray reduces condensation on the inner lens. It has zero effect on the physical seal between the gasket and your skin. If someone tells you anti-fog spray will stop leaking, they’re solving the wrong problem.
Any soap other than baby shampoo: Many dish soaps are too harsh for silicone gaskets and will accelerate degradation. If you need to clean the gasket contact surface, use a drop of baby shampoo and cold water. That’s it.
💡 Coach’s Bottom Line
Heat, abrasives, and harsh soaps are the three things that kill goggle seals faster than chlorine ever will. Cold water, baby shampoo, and air-drying are the only maintenance your silicone gasket needs. Everything else is a shortcut that costs you a new pair sooner.
Your Poolside Troubleshooting Checklist
Run through this before your next warm-up set:
| Leak Location | Likely Cause | Quick Fix |
|---|---|---|
| Inner corners, near nose | Wrong nose bridge size | Swap to the smaller bridge |
| One lens only | Twisted gasket or hair under the seal | Reset the cup, clear the edge |
| During dives or push-offs | Unstable strap position | Spread split straps high and low |
| Slow seep from everywhere | Worn-out or cracked silicone | Replace the goggles |
| Any leak with sunscreen on | Oil layer breaking the seal | Rinse face before putting goggles on |
Keep Your Clear Vision Going
You’ve fixed the leak. Don’t let fog become the next problem.
Now that your goggles are sealing correctly, the warm, humid air trapped inside the cups becomes much more noticeable – and so does the fogging that happens when that air meets the cooler lens surface.
Our guide to keeping swimming goggles from fogging up covers everything from proper anti-fog coating care to the rinsing routines that actually work – without damaging the lens.
The Goggle Questions I Get Every Season
Why do my goggles leak on one side?
A single-sided leak almost always points to a specific problem on that side – a hair or cap edge under the gasket, a twisted eye cup, or a nose bridge that’s slightly off-center.
Check the gasket seating on the leaking side first. Press it firmly into position and check the cap edge above it. If one lens cup is visibly sitting at a different angle than the other, unclip and reseat it.
Should swim goggles be tight?
The strap should be snug enough that the goggles don’t shift during turns, not so tight that they leave deep impressions or cause discomfort.
The seal comes from the gasket suction against your skin – not from strap pressure. If you’re adding strap tension to stop a leak, you’re solving the wrong problem.
How do I know if my nose bridge is the wrong size?
If water enters specifically at the inner corners of the lenses – the two spots closest to your nose – the nose bridge is usually the cause.
Try swapping to the next size down. If the inner corner leak stops, you’ve found your size. Bridges that are too narrow cause outer-edge leaks instead.
Why do my goggles leak when I dive or push off?
The impact of a dive or the water turbulence from a fast flip turn creates a brief force on the goggle.
If the strap isn’t properly anchored, the cups rock forward enough to break the seal for a moment. Spread a split strap to two different heights on the back of your head, or ensure a single strap is sitting evenly on both sides.
How long do swim goggle seals last?
There’s no fixed number, but most silicone gaskets start to show degradation after one to three seasons of regular use – depending on chlorine exposure, UV exposure from outdoor swimming, and how they’re stored.
If the silicone feels stiff, shows cracks, or the goggle no longer passes the dry suction test on a clean face, it’s time to replace.
When to Switch Goggles Instead of Fighting the Same Pair
If you’ve worked through every step above and the goggles still leak, the shape is the problem – not the setup.
Not every goggle fits every face. The geometry of the lens cup, the gasket stiffness, the profile height – all of it has to match your specific eye socket shape. Some pairs seal on the first try. Others never will.
Our fit guide for swim goggles covers how to match lens profile to face shape and what a correct seal actually feels like.
Most coaches I know have a pile of “almost” pairs. Whether that’s one pair from now or three… well, you’ll know it when the seal holds.
Disclosure: This article features AI-assisted imagery to help provide a more intuitive and visual reading experience.
Leave a Reply