You’ve been there. Mid-lap, water pouring in from the left lens, your whole workout derailed because your goggles just don’t fit right. You yank the straps tighter. It gets worse. Sound familiar?
Here’s what I’ve learned after years of coaching swimmers – beginner to competitive – through this exact frustration: the problem almost never is the goggles themselves. It’s the fit. And fit has nothing to do with price.
The right pair of swimming goggles isn’t the most expensive one on the shelf. It’s the one that matches the geometry of your face.
In this guide, I’ll walk you through exactly how to choose the perfect swimming goggles – from the one test most swimmers skip entirely, to matching nose bridges to your face shape, to picking the right lens for where you swim.
🏊 Quick Summary – Key Takeaways
- What you’ll learn: The dry suction test, nose bridge sizing, strap adjustment, and lens selection.
- Time to see results: Immediate – you can test this before you even leave the store.
- Difficulty level: Beginner-friendly.
- Key equipment needed: A pair of goggles to test (or a few options to compare).
⚠️ Safety Disclaimer & Target Audience
Best for: All swimmers – from first-timers to lane regulars – who struggle with leaking, discomfort, or just want to choose better next time.
Skip if: You need specialty prescription diving masks (different application, different fitting rules).
Coach’s reminder: If you feel sharp pressure around your eye socket or a headache during swimming, stop and remove the goggles immediately. Pressure should be light – never painful.
Table of Contents
- Before You Test Anything, Grab These
- Why Some Goggles Leak No Matter How Tight You Pull
- Step 1: The Dry Suction Test (Most Swimmers Skip This)
- Step 2: The Nose Bridge Makes or Breaks the Center
- Step 3: Strap Placement Done Right – Snug, Not Strangled
- Step 4: Lens Tint – Light Conditions First, Looks Second
- The Full Fitting Checklist – Run It Every Time
- The Fit Is Sorted. Now Pick the Model.
- Your Leaky Goggle Days Are Over
Before You Test Anything, Grab These
No exotic gear required. But a few things help:
- At least one pair of goggles to test (two or three if you’re buying new and unsure).
- Clean, dry skin around your eyes – oils affect how accurately you can test the seal.
- Basic awareness of your face shape: do you have a narrow or wide nasal bridge? Do you know if past goggles have pinched your nose or floated wide of your eyes?
If you’re starting from zero, Wikipedia’s overview of swimming goggles is genuinely useful for understanding the different frame styles before you start testing.
Why Some Goggles Leak No Matter How Tight You Pull
This is where most guides skip something important. And it’s the root cause of 80% of goggle complaints I hear on the pool deck.
The seal on a swim goggle is created by the silicone gasket sitting flush against the orbital bone – the curved ridge around your eye socket. It’s not created by the strap.
If the frame shape of the goggle doesn’t match the contour of your eye socket, the gasket will sit at an angle. Water finds that angle. Every time.
Pulling the strap tighter doesn’t fix a shape mismatch – it just deforms the gasket further and creates a new gap. According to the American Academy of Ophthalmology, goggles that don’t seal flush against your eye socket let pool water seep under the frame with every stroke – irritating the tear film, triggering swimmer’s eye, and opening the door to bacterial infection.
The fix? Choose a frame shape that already seals before you even touch the strap. That’s what the next step is about.
Four steps. That’s genuinely all it takes to go from “these leak every time” to a pair that actually works. Walk through each one in order – skipping ahead is how people end up back at square one.
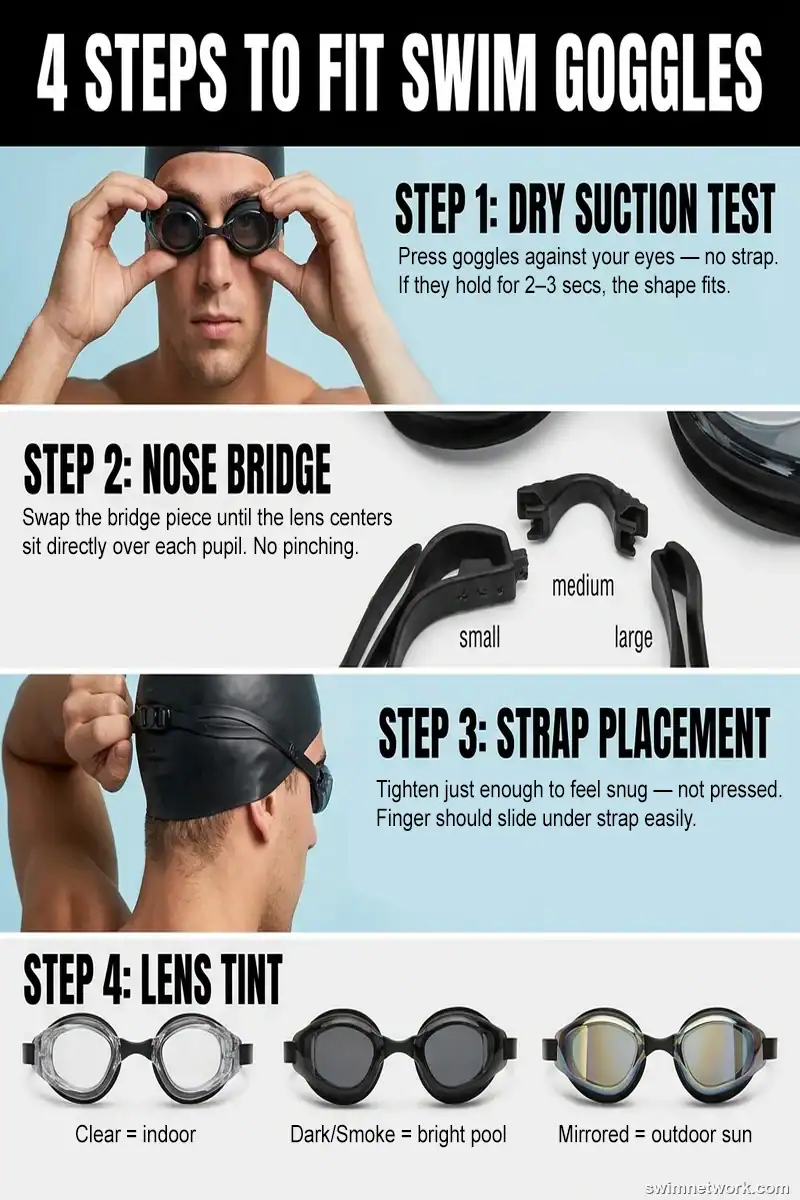
Step 1: The Dry Suction Test (Most Swimmers Skip This)
This is the single most useful thing I ever taught a swimmer about goggle fitting. And almost nobody does it.
The Suction Test, Step by Step
- Hold the goggles in front of your face. Let the strap hang free – do not put it over your head.
- Gently press the lens cups against your eye sockets using just your fingertips. Don’t push hard.
- Release your fingers and observe what happens.
If the goggles stay in place for 2–3 seconds without any strap support – you have suction. That’s a seal. That goggle shape fits your face.
If they fall off immediately – the gasket isn’t sitting flush. The frame shape doesn’t match your eye socket geometry. No amount of strap tension will save it.
Where Most Swimmers Go Wrong
Pressing too hard to try and force suction. It doesn’t work that way. The suction should come naturally from a gentle press – if you’re pushing them in hard, you’re testing pressure, not fit.
💡 Coach’s Tip
Test 2–3 different goggle models side by side with the dry test. You’ll feel the difference immediately between a shape that fits and one that doesn’t. This one test saves you weeks of mid-swim frustration.

📹 Video Quick Recap:
- The strap does not create the seal – it only holds what’s already there.
- A correct fit produces a light vacuum when you press the lenses gently.
- Goggles sitting too close to the eye can cause discomfort over longer swims.
Step 2: The Nose Bridge Makes or Breaks the Center
Passed the suction test? Good. Now the nose bridge determines whether those goggles sit centered over your eyes or drift to one side.
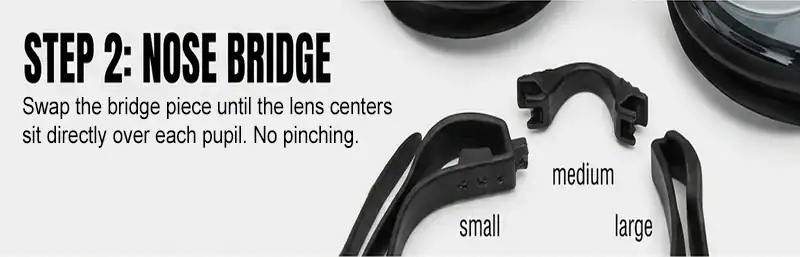
Most modern training goggles include interchangeable nose bridges in small, medium, and large. Some have a single adjustable arch. A few (especially cheaper ones) have a fixed bridge – and that’s a problem if your face doesn’t match their one-size-fits-all assumption.
The Bridge Size That Actually Centers Your Lenses
- With the goggles loosely on your face, check whether the lens centers align with your pupils.
- If the lenses sit too close together and pinch the bridge of your nose – go up a size.
- If they sit too wide and the strap pulls awkwardly at the temples – go down a size.
- A correct fit: no pinching, no spreading, lens center over each pupil.
The Mistake That Kills the Fit
Skipping the bridge adjustment entirely. I’ve seen swimmers buy goggles that pass the suction test beautifully, then wear them on the wrong nose bridge size for months – and complain about them drifting or leaking from one side only.
One-sided leaks are almost always a nose bridge sizing issue, not a gasket problem.
Step 3: Strap Placement Done Right – Snug, Not Strangled
By now, the goggles should already be sealing and centered. The strap’s job is simply to hold them in place – not to create or correct the seal. This distinction matters more than most people realize.
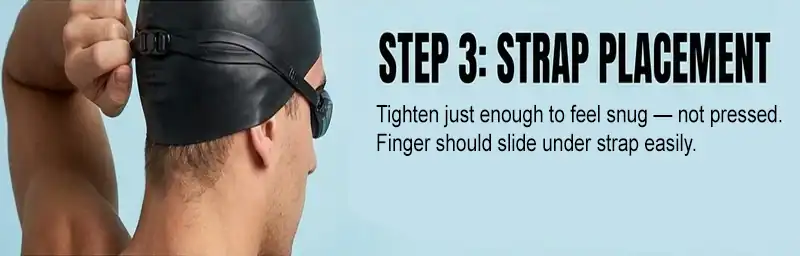
High on the Head, Light on the Tension
- Position the split strap just above your ears, toward the crown of your head – not low on the skull.
- Tighten until the goggles feel snug but not pressed. You should be able to slip a finger under the strap.
- Take a few head movements side to side. If they stay in place – you’re done.
Check the silicone gasket too. Run your fingertip along the inner rim. It should feel pliable and smooth – if it’s stiff or cracked, the gasket is degraded and needs replacement (or it’s time for a new pair).
The Tighter You Pull, the Worse It Gets
This is the mistake I see most often, and it’s completely counterintuitive. Swimmers pull the straps as tight as they’ll go to stop a leak… and the leak gets worse.
Here’s why: extreme strap tension distorts the frame, which pulls the gasket away from the orbital bone on one side while pressing it in on the other. That creates a gap – the exact opposite of what you want.
It also causes “swimmer’s headache” – a dull ache around the eye sockets and temples that most people blame on the pool, not their goggles. If you’ve ever finished a swim feeling like you had a mild headache developing all along the brow line… your straps are too tight.
Step 4: Lens Tint – Light Conditions First, Looks Second
Once fit is dialed in, lens color is the final variable. This one is genuinely about where you swim – it’s not aesthetic.
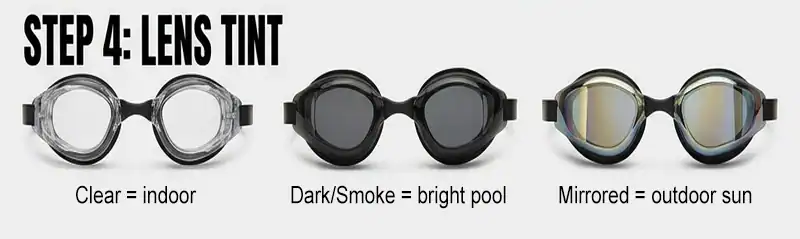
- Clear lenses: Indoor pools, low-light conditions, early morning or evening swims. Maximum light transmission. If you can’t see the lane lines clearly between sets, these are your lenses.
- Smoke/Dark lenses: Bright indoor facilities with overhead glare, or outdoor pools on overcast days. Cuts brightness without distorting colors.
- Mirrored lenses: Outdoor swimming in direct sunlight. They reflect light rather than just absorbing it – critical for open water swimming where sun glare off the surface is genuinely disorienting.
- Polarized lenses: Best for open water navigation. Dramatically reduces surface glare, making it easier to sight buoys.
UV protection: Non-negotiable for outdoor swimming. Look for the UV 400 rating on the packaging – according to the American Academy of Ophthalmology, UV 400-rated lenses block 99–100% of UV-A and UV-B rays, providing full protection against sun-related eye damage.
Anti-fog coating: Nearly all modern goggles include it. Preserve it by rinsing with cold water after each swim and never wiping the inner lens with your fingers or a cloth. The coating is thin – it doesn’t survive abrasion.
💡 Coach’s Bottom Line
Fit comes first, always. Once you have the right seal and bridge size, pick the lens color that matches where you swim most. That combination is what ends the leaky goggle cycle for good.
The Full Fitting Checklist – Run It Every Time
Use this sequence every time you’re testing a new pair – in a store, online unboxing, or at the pool:
| Step | What to Test | What “Pass” Looks Like |
|---|---|---|
| 1. Dry Test | Frame shape vs. eye socket | Goggles hold for 2–3 seconds without strap |
| 2. Nose Bridge | Width vs. nasal bridge | Lenses centered, no pinching or spreading |
| 3. Strap Check | Tension and placement | Snug above ears, finger fits under strap |
| 4. Lens Choice | Tint vs. swim environment | Clear = indoor, Mirrored = outdoor, UV 400 = essential |
The Fit Is Sorted. Now Pick the Model.
Once you’ve found the goggle shape that actually fits your face, the next question is: which specific model?
We’ve put together an in-depth breakdown of the top options across every category – including training, open water, and competitive racing goggles – in our guide to the 22 Best Swimming Goggles. Every recommendation there has been tested against the same fit criteria we just covered.
And if you want to go deeper on the prescription goggle side – especially for swimmers who wear a corrective lens – check out our 11 Best Prescription Goggles for Swimming for options that apply the same sizing logic.
Your Leaky Goggle Days Are Over
Or at least… they should be. If you’ve run the suction test, dialed in the nose bridge, and set the straps without over-tightening – you’ve done more than most swimmers ever will.
The only thing left is taking care of what you’ve got. Goggles that fit well still need to be maintained to keep fitting well. For that, check out our guides on how to keep swimming goggles from fogging up and how to clean swimming goggles – both cover the anti-fog coating specifically, which is usually the first thing swimmers accidentally destroy.
A good pair of goggles, properly fitted and properly maintained… can honestly last you a couple of seasons. Whether that holds up for your pair depends on how consistent you are with the rinse-and-store routine. We’ll see.
Disclosure: This article features AI-assisted imagery to help provide a more intuitive and visual reading experience.
 Why Your Freestyle Swimming Technique Matters: A Comprehensive Guide 2026
Leave a Reply